My mom came to visit me a couple weeks ago and she brought this cool project with her. She is crafty and creative, as you can see here.
For six placemats, you will need:
- a jelly roll of fabric or strips of fabric 2 1/2 inches
- 1 to 1 1/4 yard quilt batting
- 1 to 1/4 yard. coordinating fabric for back of placemants
- bias tape or about 1/2 yard extra fabric to make your own bias tape.
First, prewash your fabric and batting, following the care instructions. If you don't do this, your place mats will shrink after you finish making them and they won't be the size you want. Then, after the fabric is washed and dried, iron it with spray starch.
On a side note, if you haven't tried spray starch, do yourself a favor and go buy some. It's not expensive and it makes a huge difference when you're ironing. It works particularly well when you are sewing cotton fabric because it allows you to iron more carefully, and the fabric stays ironed. And my mom always says good sewing comes from good ironing.
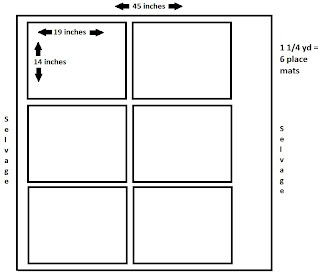
Then, you'll need to decide what size you want your placemats to be. I wanted mine to be the usual rectangle, so I measured mine at 19 inches by 14 inches. You can even use an old placemat as a pattern. Then, cut out six pieces of the fabric and the quilt batting to that size. Depending on the design on the fabric and the way you want the placemats to look, there are two ways to fit six placemats on the fabric:
I used the second one, because I liked the way the design on the fabric looked horizontally rather than vertically. It does take up a bit more fabric than the other way, but how you make yours is up to you.
Fabric and Batting cut to size
Next, you will take the jelly roll strips, and cut them to the corresponding length, which in this case was 14 inches. I decided on a random placement of the jellyroll strips of fabric. Starting with one strip, I made sure that the following strip had at least one color in common, and then continued through the stack. But, you can decide the order any way you want.
Jelly roll strips cut into 14 inch length strips
To put everything together, you will place the fabric backing right side down, and place the quilt batting on top.
Next, you place your first strip of fabric on the left side of the placemat, right side up.
Then, place the next strip, directly on top of that strip, wrong side up.
Pin the strips down, and then sew them into place on the right side of the strips using 1/4 inch seam allowance.
This picture is taken with later strips, but instructions are the same.
Make sure than you are sewing through ALL the layers of fabric. If you have a walking foot, I would recommend that you use it because it makes sewing through the bulky fabric much, much easier.
Then, fold over the second strip, and iron it down so that both strips are right side up.
Repeat again with following strips until you reach the edge of the placemat. Iron last remaining strip and trim any hanging fabric.
Repeat for the remaining place mats. I ended up making six, although depending on the amount of fabric you begin with, you could do more.
Now for the bias tape and binding. I made my own double fold wide bias tape. And having the experience of making it just once without the bias tape maker, let me tell you, it is so worth it to buy it! You can use this bias tape tutorial to learn how to make your own. And remember that spray starch is your best friend!
Then, to sew on the bias tape, you can use this tutorial. Pay attention to the corners though, because it can get a little bit tricky.
Once you are done, admire your work, and don't hesitate to give yourself some hard-earned compliments. My placemats look great!
You'll notice that each of my placemats is different due to the random nature of the jellyroll, but they all compliment each other very well.


Cute! I love that you sew through all the layers at once. Genius!
ReplyDelete